

How To Use Saw Set Pliers
For any saw to cut properly requires only the correct amount of set. Also much and the saw requires too much try to use, too piddling and it binds in the cut. In this article we'll investigate what set is, figure out how much is needed, and hash out how to properly apply it.
Saw gear up is the slightly increased thickness of the blade at the cutting edge. This is necessary because if the blade were a constant thickness throughout, the saw would before long bind in the wood being cut due to the friction bearing against the sides of the saw. To overcome this trouble, the blade is  fabricated slightly wider at the cutting edge by angle every other tooth outward abroad from the center of the blade. This bending is accomplish with a saw set, a specialized tool made just for this purpose. The increased thickness of the bract at the cutting edge causes the saw to cutting a wider kerf than the saw is thick, allowing the saw to cut quickly and efficiently through the piece of work.
The topic of how much fix is required in a saw is one that has many answers. It depends on factors such equally the type of blade, the thickness of the bract, and the type of material beingness cut.
Offset of all, saw blades are generally found of two types, taper ground and constant thickness. By far the most desirable is a taper ground blade. A blade that is taper ground is thicker forth its edge than it is at the back. This is a great help in applying ready as the blade already has a sure amount of clearance congenital in. A blade that is taper ground requires less set than one that is a constant thickness. This causes the overall thickness of the edge to be thinner and results in a thinner kerf. A thinner kerf requires less effort to cutting than a thicker ane. It is for this reason that saws with taper basis blades are so desirable.
The thickness of the saw blade is also important. Almost loftier quality taper ground blades are about .035 inches thick at the cutting edge. They vary from manufacturer to manufacturer. Blades that are nigh this thickness seem to strike a good remainder in that they are thin enough to produce a narrow kerf, but thick enough not to kink while in use. Blades that are a constant thickness mostly fall into 2 categories, saws that are very old, and saws that are of recent manufacture. Saws tat are very old, that is that date from the early on 19th century and before, are usually the aforementioned thickness throughout due to the limitations of grinding equipment at that fourth dimension. Saws produced in the mid 19th century to the late 1960s are usually taper ground. Some lesser quality saws of this vintage can be institute with constant thickness blades. Saw blades of very recent manufacture are also normally the same thickness throughout, and should exist avoided.
The corporeality of prepare required is different for softwoods (or forest that is moisture) and dry hardwoods. Dry hardwoods require much less set than practice softwoods or forest that have not been dried. For softwoods, this is due to the resinous pockets that are encountered in the cut as well equally the gluey nature of the saw dust created during the cutting. For forest that are wet, this is due to the gummy nature of the dust also as the trend of the wood existence cut to warp and twist as it is cut.
The bodily amount of fix practical to the blade is measured with a micrometer A practiced method to use is to measure the thickness of the blade but in a higher place the teeth to get an idea of how thick the blade is without any prepare. Unless a saw has just had new teeth cut, it will have at least some prepare. Permit's say nosotros measure the saw in question and the blade is .035 inches thick. A practiced rule of pollex is to increment the thickness 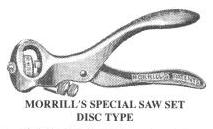 of the blade by 20% for dry out hardwoods, and 25-thirty% for softwoods. So, our .035 blade would need to be increased to .042 inches for use in hardwoods, or up to .046 inches for softwoods and wood that is wet. This is just a guideline, but it is a good place to start until experience with your particular set is gained. Afterwards setting a few saws and receiving feedback from the work, you'll define a very narrow range on your ready which produces proficient results time after time without going through the hassle of measuring your blade and doing calculations. It should exist noted that blades with constant thickness volition often require even more set. Sometimes then much set is required that it takes forever to make a cut due to the extreme amount of textile that must be removed. Information technology is for this reason that constant thickness saws are best avoided. Fortunately, xc% of the saws that are encountered are taper basis.
And then, we've determined how much set is required, simply now how to utilize it? There are many, many different types of saw sets that 1 could employ. The simplest blazon is a saw wrest which is nothing more than a piece of steel with slots cut into the edge. The slots are of various thickness for different thickness blades. Saw wrests are difficult for the novice to use, and tiresome for the experienced. Information technology is for this reason that there were and so many different types of mechanical saw sets developed. There are basically two major types that are likely to be encountered. Both have ii handles, ane of which moves and pushes a plunger forward to set the tooth. The difference is in the structure of the anvil. The anvil is the function of the saw set that the tooth is pushed upwardly against. The farther the anvil is away from the tooth, the more than set the saw tooth receives. One major type of saw set up has a rotating disc for an anvil. The disc is ground and then that the 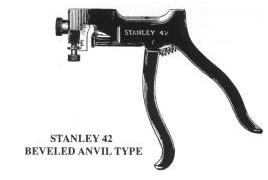 edge is gradually relieved more and more than. In add-on, numbers are stamped around the edge of the disc which are supposed to correspond to the pitch of the teeth being set. if this type of set is to be used, it is my experience that it is all-time to avert relying on these numbers and instead set up a baseline past trial and error. The 2nd major type of gear up has an anvil which consists of a beveled piece of steel which tin can be slid up and down a rails. This type of set usually just has arbitrary graduations instead of bodily numbers. This type of ready is by far my favorite. The Stanley 42X saw gear up is of this type and is a very well designed, easy to utilise tool. Even improve, they tin can be found for $20-xl on the old tool market, oft in their original box with instructions.
The conventional wisdom is to set up a saw'southward teeth earlier it is sharpened. I disagree with this approach for several reasons. If a saw is fix before it is sharpened, and then part of the fix is removed when the teeth are filed. It is very hard to try to figure out how much the ready is decreased in filing as it is dependent on many factors such as how sharp the file is, how hard you bear on the tooth with the file, and how compatible the saw teeth are filed. I prefer to set the saw subsequently it has been sharpened. The saw set, of form, being made of cast atomic number 26 will dull the teeth unless steps are taken to preclude it. I record modest pieces of veneer on the part of the gear up that the saw teeth comport on with double stick tape. After setting a few saws, the veneer volition commencement to wear through and is hands replaced. By setting the saws teeth after it has been filed, a very uniform gear up can be achieved which not but makes the saw cut well, but too makes a very nice terminate on the piece being cutting. Information technology only takes i or ii teeth to exist over-set to make the border of a cut piece of woods ragged and rough.
Really, setting a saw is a fairly quick and like shooting fish in a barrel job. It doesn't thing where you start, at the heel or the toe of the saw. I like to outset at the heel of the saw considering these teeth usually aren't used in cutting which brand them ideal candidates to use for calibrating your ready. It is important where the plunger hits the molar to provide the best set. In crosscut  teeth, line the plunger up then it contacts the tooth exactly where the two fleam angles come together. Hitting the tooth here gives yous the all-time leverage and provides a very compatible set up. For rip teeth, let the plunger make contact with the molar only below the cutting bespeak. It is very important
 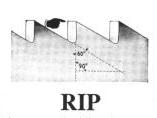 that yous not button on the eye of the rip tooth as you lot have very little leverage there and consequently won't move the tooth over very much. What I hateful by leverage is that the other side of the tooth is sloped back at a sixty degree angle. The closer you get to the slope, the harder it is to motility the tooth out away from the blade. Staying on the other side of the tooth increases the length of the lever and makes information technology easier to push the molar. It sounds disruptive, but afterwards setting a few teeth, yous'll speedily empathize what I'm talking about. Adjust your set to a minimal setting. Beginning at the start tooth under the handle and line up the set plunger on the tooth. Firmly and smoothly grip the handle to set the tooth. It is very important to use the same amount of pressure each and every time y'all gear up a molar. To do otherwise results in teeth that accept different amounts of gear up which will make the saw difficult to utilize. Skip a tooth and set the side by side tooth, so on. After about an inch has been set, flip the saw around and prepare the teeth you lot skipped from the other side. When you're done, you'll have a small-scale amount of blade to place your calipers on and take a measurement. Hopefully, you'll exist short of the desired thickness. Increase the corporeality of gear up by moving the anvil on your saw prepare. Echo the procedure on the same teeth and measure over again. Continue until you've reached the amount of fix calculated. Once your saw prepare is calibrated, set one entire side of the saw, plow the saw around, and set the teeth on the other side that you skipped. When you are done, sight along the teeth. They should be evenly bent outward, the same on each side.
The ultimate examination of whatever prepare job is how well the saw cuts. Take some scrap and beginning a cutting. The saw should glide through the forest without jumping around in its kerf. It should not be hard to push, nor should it be "roomy" in the kerf. If either of these weather condition exist, increase or decrease the set appropriately. If the saw tracks away from the line, the side of the saw that is furthest from the line has likewise much prepare. A simple remedy is to lightly stone the edge of the offending side with a medium Republic of india slipstone. Have one swipe with the stone, and try another cutting. Usually only one or ii passes with the stone will correct the trouble. Don't remove besides much, however, or you'll accept the aforementioned problem on the other side until not enough set is left to make the cut.
Once y'all've determined by trial and error that you take just plenty attack that particular saw, make a note of where your saw set is adjusted for future reference. You lot'll find that y'all'll movement your ready very piffling for all the dissimilar saws in your shop.
A properly set saw is essential for trouble complimentary, enjoyable cutting. Once you empathize what set is, why it's important and how to utilise it, yous'll be a long mode toward that enjoyment.
Art work from:
Disston Saw Tool and File Manual, 1936.
Biddle Co. Itemize 1910
© 1997 Peter Taran. All rights reserved.

How To Use Saw Set Pliers,
Source: https://www.vintagesaws.com/library/ftj/spring97/spring97.html
Posted by: mcbeewhoduch.blogspot.com
0 Response to "How To Use Saw Set Pliers"
Post a Comment